
Showing posts with label Website. Show all posts
Showing posts with label Website. Show all posts
Geek Guru [Review]
Hey guys! Have you heard about GeekGuru? Wel, if you haven't, then lemme tell you, its a site which acts as a search engine for the articles related to hacking and other useful information.
The site contains 6 pages in total.
Home
Its the page which contains the main search box. You can start from here.
Forums
Its the most important page of the site which is the most useful if you have any sort of technical queries related to hacking or any other doubts related to computers. You can just leave behind the question and it will be answered within 24 hours [checked]
Add your Site/ Blog
Do you own a website/blog? Have something which can prove helpful to the others? Then what are you waiting for?? Just get it listed officially! All you have to do is to visit this page and leave behind your contact and other important information which the admin will check out and very soon contact you if your website is eligible for GeekGuru.
Fun
Bored surfing through the net? Or wanna relax after writing/studying for an exam? This section will bring you the best in online flash games and the hacking tools are gonna be added very soon, as per the web designer.
About Us
This sections contains the info about the site in general.
Contact Us
This tab will help you connect with the Facebook or Twitter fan page of the owner.
Impressed? Add your website now! Click Here
 |
| Geek Guru Homepage |
The site contains 6 pages in total.
Home
Its the page which contains the main search box. You can start from here.
Forums
Its the most important page of the site which is the most useful if you have any sort of technical queries related to hacking or any other doubts related to computers. You can just leave behind the question and it will be answered within 24 hours [checked]
Add your Site/ Blog
Do you own a website/blog? Have something which can prove helpful to the others? Then what are you waiting for?? Just get it listed officially! All you have to do is to visit this page and leave behind your contact and other important information which the admin will check out and very soon contact you if your website is eligible for GeekGuru.
Fun
Bored surfing through the net? Or wanna relax after writing/studying for an exam? This section will bring you the best in online flash games and the hacking tools are gonna be added very soon, as per the web designer.
About Us
This sections contains the info about the site in general.
Contact Us
This tab will help you connect with the Facebook or Twitter fan page of the owner.
Impressed? Add your website now! Click Here
Disabling Right-Click On Your Website
Have you noticed some websites with the right-click disabled? Well. Thats really a great thing to do when you dont want the people to be able to see few of your HTML codes. For ex: Inspect Element in Google Chrome.
This fuction adds on a step to your privacy. Anyhow, this can't be said as the highest level of security and there is no bypass to it. But, as I said earlier, it just adds on a step. You can see this website as an example.
Here is the code which will help you out with the process described above.
Copy the above code and paste it in Dashboard > Layout > Add Gadget > HTML / JavaScript.
Thats it! You are done.
And yeah. Don't forget to drop down the comments!
This fuction adds on a step to your privacy. Anyhow, this can't be said as the highest level of security and there is no bypass to it. But, as I said earlier, it just adds on a step. You can see this website as an example.
Here is the code which will help you out with the process described above.
<script language="JavaScript">
<!--
var message="Function Disabled!";
///////////////////////////////////
function clickIE4(){
if (event.button==2){
alert(message);
return false;
}
}
function clickNS4(e){
if (document.layers||document.getElementById&&!document.all){
if (e.which==2||e.which==3){
alert(message);
return false;
}
}
}
if (document.layers){
document.captureEvents(Event.MOUSEDOWN);
document.onmousedown=clickNS4;
}
else if (document.all&&!document.getElementById){
document.onmousedown=clickIE4;
}
document.oncontextmenu=new Function("alert(message);return false")
// -->
</script>
Copy the above code and paste it in Dashboard > Layout > Add Gadget > HTML / JavaScript.
Thats it! You are done.
And yeah. Don't forget to drop down the comments!
Method to Enable Right Click On Websites
You probably may have come across some websites that doesn’t allow you to copy any content from there websites by blocking right click.When you press right click on these websites either you will get a prompt with some message or nothing will happen.Sometimes this is very annoying as you may need that content for your college project or some other urgent purpose.There are several workarounds to bypass this.
 I will tell you the best and the most simple trick.You don’t require any software or addon for this trick.Website that block the right click do it using a javascript code.If you block javascript code in your browser then your right click cannot be blocked. Here is the tutorial on How To Enable Right Click on Websites
If you are Using Internet Explorer Browser
 I will tell you the best and the most simple trick.You don’t require any software or addon for this trick.Website that block the right click do it using a javascript code.If you block javascript code in your browser then your right click cannot be blocked. Here is the tutorial on How To Enable Right Click on Websites
If you are Using Internet Explorer Browser
- Goto Tools>Internet options>Security
- Now Click on Custom Level
- Now find Scripting Section it will be around the end.
- Now disable Active Scripting.This will disable JavaScript and vbscript in your browser.
- Click on OK.
- Now restart your browser
- Goto Tools>Options>Content
- Uncheck the box Enable JavaScript
- Click Ok
- Open the website that have blocked your right click.
- Click on the Wrench Icon on the top right side on your browser.
- Click on Options
- Now goto Under the Hood tab
- Click on Content Setings and then on JavaScript
- Disable java script and open the website.
Editing any Website (In Google's Chrome Browser)
In the previous post, I told you all how to edit any website using the Javascript.
Today, I will tell you a kinda advanced method to do that. This method is,till now, applicable for only the Google Chrome browser. I will take "Facebook" as an example and show you the steps to it.
1. Open Facebook.com.
2. Decide the part of the page which you want to edit. Right-click that part and click Inspect Element.
3. Then, you will see the Inspect Element box popping out from the bottom of the screen. This is where you can edit the elements on the page like, text, pic url, etc.
Note: Here I have taken the text "Facebook helps you connect and share with the people in your life."
4. Now double-click the code in the box and replace with the text of your choice!
Today, I will tell you a kinda advanced method to do that. This method is,till now, applicable for only the Google Chrome browser. I will take "Facebook" as an example and show you the steps to it.
1. Open Facebook.com.
2. Decide the part of the page which you want to edit. Right-click that part and click Inspect Element.
 | |
| Click to Enlarge. |
3. Then, you will see the Inspect Element box popping out from the bottom of the screen. This is where you can edit the elements on the page like, text, pic url, etc.
 |
| Click to Enlarge |
4. Now double-click the code in the box and replace with the text of your choice!
 |
| Click to Enlarge |
Create a Tabbed Content Widget for Blogger!
Tabbed content box or tab view is a great way to maximize the usage of precious screen real estate on your blog.
There are quite a few tutorials out there that show how to create tabs with CSS and jQuery. However, most of them require you to modify your blog template codes. On top of that you also have to manually add the content of each tab.
Fortunately, with this tutorial you don’t have to go to all that troubles. All you have to do is add our tabber code into a HTML/Javascript widget. Once added, it will transform your Blogger blog’s existing widgets into tabs, automatically!
See the demo here.
Below are some of the features of the tab content box:
Courtesy : BloggerCentral
There are quite a few tutorials out there that show how to create tabs with CSS and jQuery. However, most of them require you to modify your blog template codes. On top of that you also have to manually add the content of each tab.
Fortunately, with this tutorial you don’t have to go to all that troubles. All you have to do is add our tabber code into a HTML/Javascript widget. Once added, it will transform your Blogger blog’s existing widgets into tabs, automatically!
See the demo here.
Below are some of the features of the tab content box:
- Accommodates unlimited number of widgets.
- Keeps the tabbed widgets’ original appearance.
- Fully widgetized for ease of installation and removal. If you don’t like what it does, simply remove the HTML/Javascript gadget.
Installation
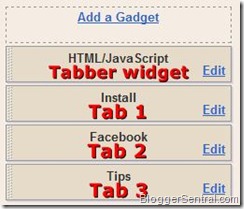
- Go to Design > Page Elements and click Add A Gadget.
- Select HTML/Javascript widget.
- Leave the title box blank.
- Copy the code below and paste it inside the content box.
<style type="text/css">
.tabber {
 padding: 0px !important;
 border: 0 solid #bbb;
}
.tabber h2 {
 float: left;
 margin: 0 1px 0 0;
 font-size: 12px;
 padding: 3px 5px;
 border: 1px solid #bbb;
 margin-bottom: -1px; /*--Pull tab down 1px--*/
 overflow: hidden;
 position: relative;
 background: #e0e0e0;
 cursor:pointer;
 -moz-border-radius:5px 5px 0 0;
 border-radius:5px 5px 0 0;
}
html .tabber h2.active {
 background: #fff;
 border-bottom: 1px solid #fff; /*--"Connect" active tab to its content--*/
}
.tabber .widget-content {
 border: 1px solid #bbb;
 padding: 10px;
 background: #fff;
 clear:both;
 margin:0;
}
.codewidget, #codeholder {
 display:none;
}
</style>

<script type="text/javascript" src="http://ajax.googleapis.com/ajax/libs/jquery/1.6.0/jquery.min.js"></script>
<script type="text/javascript" src="http://greenlava-code.googlecode.com/svn/trunk/publicscripts/bloggertabs0.1_min.js"></script>
<script type="text/javascript">
$(document).ready(function() {
 $('#codeholder').bloggerTabber ({
  tabCount : 3
 });
});
</script>
<div id='codeholder'><p>Get this <a href="http://www.bloggersentral.com/2011/05/create-tabbed-content-blogger-widgets.html" target="_blank">widget</a></p></div> - Position the HTML/Javascript gadget above the gadgets that you want to tabify.
- Click Save and view your blog.
Post-installation
- Make sure you title each widget that you want to tabify. Tabber won’t work properly without widget titles.
- Reduce tab widths so that all tabs fit into a single row. This can be achieved by using short widget titles.
- You may need to reduce the widths of the tabified widgets to fit them into the box.
- Don’t forget to test in Internet Explorer. This widget may cause “Operation aborted” error in IE for some non-designer templates. If that’s the case, this widget is not for you :(
Courtesy : BloggerCentral
Live chat with your visitors | A tool by Google!
This tool is invented by Google and is named 'Google chatback'. This service allows your customers to chat with you directly when you are online. The requirements by you is just an Gmail ID and your customers need nothing but your website URL! This is really a amazing and innovative idea by Google.
Actually the problem is that the users who visit your site are usually lazy [no harms intended ;)]. They dont like logging in or creating an ID to just talk to you, etc etc..
So the conclusion is, THIS IS A GREAT TOOL! Try it..
Actually the problem is that the users who visit your site are usually lazy [no harms intended ;)]. They dont like logging in or creating an ID to just talk to you, etc etc..
So the conclusion is, THIS IS A GREAT TOOL! Try it..
Subscribe to:
Posts (Atom)